
Aimed at anyone who wants to make airline liveries, but:
- is new to SimplePlanes,
- feels that their liveries look terrible,
- or just want to improve.
Even for silver/gold players, don't skip any of the sections, there is always something you might not have realised before!
Upvotes are appreciated, comments are even more appreciated!
Wait... you know what an airline livery is right? If your answer is no, it's the colours that airlines paint on their planes, like these:

Yeah, those.
Introduction
If you don't know me yet, I specialise in making airline liveries (though I do build other things too!). Here are some of the liveries that I've made:
and finally, Turbo Lines RL-72 (54 upvotes).

And now that I've reached gold, I will be spilling my secrets of how I make liveries like these. Why? I don't really know, but I probably just want to see more people make good-quality airline liveries.
With that, on to the tutorial!
Make Sure You Have These:
- XML modding (mobile users can enable it in-game)
- A drink, because this is going to be one looooong tutorial.
Part 1: Getting the Right Plane
If you're building your own airliner, you can skip this bit. However, if you're new and have no idea how to make airliners properly, you should get a plane from somebody else.
2 things you should take note of:
- Get a blank plane. One that does not have a livery. In my opinion, by having to do the livery from scratch, it makes others feel that you are putting more effort into what you build, getting them to upvote your livery. Besides, doing so also gives you more freedom to build a livery in this manner, as not all liveries use the technique that I'm sharing with you.
- [Edit] Also, make sure that the plane you’re downloading was built after 1.11, the update where fuselage smoothing was introduced. Planes built after this update generally have much lower parts than their predecessors, so your posts will be more mobile-friendly.
- If their bio states that you need permission to use their aircraft, always, ALWAYS, just ask. Even more important, ALWAYS GIVE CREDIT. You don't want to end up in a dispute.

For my demonstration, I'm downloading a 777-300ER from GalacticaAsia.
Part 2: Making A Cheatline
This is it, the fundamental process of my livery technique.
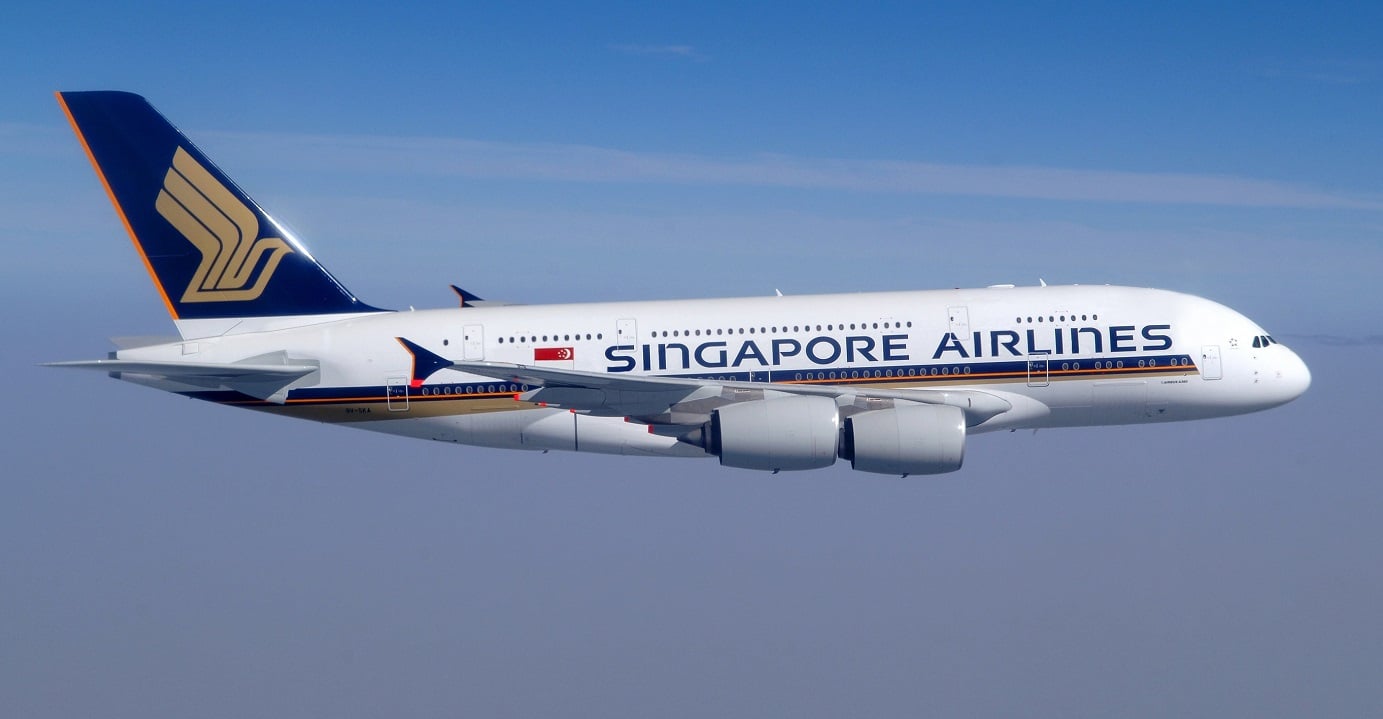
For those of you who don't know what a cheatline is, it's the stripe that goes across the plane's windows, like this:

This can be seen on most retro liveries, and even some from today (e.g. Singapore Airlines). I'm teaching you this because cheatlines are perfectly straight, unlike other patterns.
Step 1: Copying the Fuselage Section
- Select a piece of fuselage right in front of the wing.
- Right-click and drag the piece to make a copy of it. (For mobile players, mirror the individual part.)

Step 2: Resizing and Positioning
Open up your XML editor. You should see the "scale" bar somewhere there, which is set to a specific value (e.g. 1,1,1). Now, set the FIRST TWO VALUES of the scale to just over that value. (For example, 1.001,1.001,1). This is because the last value is the length of the fuselage, and if you make each livery piece slightly longer, they will overlap each other.

For my plane, the scale is (2,2,3), so I set it to (2.002,2.002,3).Now, use your precise rotation tool (the button for it is above the rotate buttons), where you can adjust the x,y and z coordinates for a part. The fuselage's x-coordinate, which is forward and backward from a side view, is always set to 0. As such, set your fuselage's x-coordinate to 0. Make sure that the part's y-coordinate (height from ground) is the same as that of the fuselage.

There, isn't it smooooooth?
Step 3: Fuselage Cutting
- Select the livery piece, go to "Edit Fuselage Shape", and go to cross-section editing.
You can see the label "Vertical Fill" at the bottom. Above it is a label marked "Advanced". Click it.

My mind when I figured this out. It's literally right there and I missed it so many times.By tweaking the "Top Fill" and "Bottom Fill" bars (you can tell which does which), you can make a stripe, like this:

Do the same thing to the other side, and voila, there's your cheatline!
Colours
If you're making a replica livery, be sure to use reference images. They really help provide a reference for you as you tweak with the colour bars finding the correct colours for your livery.
Note: Because of weird SP stuff, the colours in the builder are not completely accurate. You need to check if the colours are correct while in flight mode.
Everything is quite straightforward, until you reach the end sections.
Here's the thing: Those fill values are actually percentages of the height of the fuselage end. So 50% top fill refers to 50% of the fuselage's total height.
On a perfectly straight fuselage, meaning that both ends have the same cross-section size, a straight cheatline can be achieved because the percentages of each end's heights have the same value.
However, once one side has a smaller cross-section than the other, the cheatline becomes slanted if you input the same fill values for each side. Most of the time, even if you adjust the fill values of the smaller side, the cheatline will never be straight, simply because whole-number percentages don't make the fuselage straight anymore.

The highlighted piece, being part of the nose section, has a smaller cross-section at the front. As such, you can see that its corresponding livery piece is not straight, since the livery piece is a copy of that fuselage part.
To solve this,
1. Pull out your XML editor.
2. Select "Fuselage" from the top options bar. You should see "FillFront" and "FillBack" somewhere in the menu.

Right there, at the highlighted bit.
"FillFront" and "FillBack" should be pretty self-explanatory.
- The first 2 values in the "FillFront" and "FillBack" are the top fill and bottom fill, respectively. Add or subtract 0.5 to each value. (This works in most cases, but sometimes, 0.1 to 0.4, or 0.6 to 0.9 is needed.)

It's straight now!
Tweaking End Sections
Most annoying bit of all.
Much of the time, when you get to the nose or tail end of the plane, the livery piece will not be straight, because the cross-section of the corresponding piece dips below the level of the stripe (if you don't get it, you'll see for yourself). As such, you need to manually reduce the *length of the livery piece, and then make the smaller cross-section larger in order to prevent the piece from disappearing. This may take several hours at the beginning.
I don't really know how to better explain this, so just look at these stripes on my Turbo Lines RL-72 to see what kind of quality you should achieve.

Nose section, and

tail section.
With that, we now know how to make any livery with stripes! (sarcastic)Yippee!
Part 3: More Types of Livery Shapes
1: The "Slope" (i don't know the real name)
Making this is pretty easy, just set the front side's Top Fill to be less than the back's Top Fill.


Making the highlighted part uses the same method, just that it involves Bottom Fill instead of Top Fill.
2. The "Wavy Stripe"
This is also really straightforward, just make a lot of slanted livery pieces. For increased accuracy, make sure that the length of each piece is about 2.
Those stripes on the left and right are examples of "wavy stripes".
Tail Stripes
Basically works like normal stripes, just know that everything is now sideways. For angled stripes, you may need to adjust the rise accordingly. Just tweak all the settings until the livery piece doesn't phase in with the fuselage.
Part 4: Making Logos using Text Labels
Now, you all should know about the text label, which all livery makers use in their airline liveries in order to make that big block of words, which is the airline's name, that every airplane has.
The issue with default text labels, however, is that they have a limited selection of fonts, and they therefore only work with liveries that use Roboto font, such as Lufthansa.
However, you can make accurate text labels (at the cost of your mobile device's lag).
1. Go to this website. You should see this.

Find an image of the airline logo that you want to make and download it. I recommend that you use a photo editor to crop out all the unnecessary bits BEFORE you insert it into the software.

What I'm using for this tutorial.After you insert the file, input the following settings below.

Now copy the text field at the bottom, and place it into a text label in-game.
The full image won't show when you do this, so increase the width and height of the text label to reveal the full logo.

Final product
Note: If you're making the airline name label using this method, be pleased to know that the label can wrap around the fuselage! Just select "Curve Direction" to "Vertical" in the part settings, and adjust the "curvature" bar.
[Edit] Remember this, if you don’t want your device to be lagging severely, use the text images sparingly. That is, keep them to a maximum of 4 per build. Also, don’t use these text images to make fuselage art, keep it to airline logos only.
And we've finally reached the end of the tutorial! (whew!)
Once again, upvotes, and especially comments, are appreciated!
Note that this post will be updated from time to time as I receive suggestions; the added bits are marked as [Edit].
Be sure to read the comments for more helpful tips!
This tutorial is really long and complex, so if there's anything you want to ask me, go ahead.
No image?
[Capitalise the "I"] The problem is, I am making a house livery for my Aurora G55, a fictional medium haul airliner with 186* passengers. Since Aurora Aerospace doesn't allow cheatlines, Aurora Aerospace (ARAR) wants airlines to paint complex liveries. Its largest operator, Borealis Airways, has a 226 G55 airliners in operation. Their liveries are very complex, so I do not know how to make complicated liveries. I already made a concept on the livery painted red and orange. Can you please tell me how to make the livery???? Best Engines BE2000
I have the latest version downloaded... do i really need to download that version?
@RepublicOfCursedPlanes for the text images, the settings needed has disappeared. can you fix this?
Wonder if it has changed? Like is there something new another custom image generator for mobile? Or none?
Gente ahora se por qué no tengo que hacer un A310 de Zero g
Por qué me di cuenta que yo soy fracasado(lo tuve que leer 4 veces seguidas)
How do i do the nose cheatline thingy on the fillfront to the point where it reaches the -
Dude, thank you so much.
I do not understand how to use fill front and fill back, i tried it, and I don’t know what just happened.
How to apply text by image? Bc the image dont appear on my phone
Thanks man I need it. Now I'm making a AA [Baremetal livery](https://i.postimg.cc/jdg3s5Xb/Screenshot-2024-05-20-21-33-22-17-364988d10be4a3cfd1e255497a6782e0.jpg)on B767-200ER
this is very akward
@kasachstanball OH now i understand. I somehow forgot to write some words or something. But anyway, I wanted to say that in the part with the labels and stuff, some images are not showing. And i dont know what settings i have to use to get a good logo. (sorry for the long message)
@intruder72 im german im not good at english
What? @kasachstanball
For some reason, in the Taxt label part, the images for the settings. So, what settings should i put in?
@RepublicOfCursedPlanes BRO HELP ME MY BRITTANIA AIRWAYS LOGO WON'T SHOW UP I INCREASED THE WIDTH AND SIZE STILL NOTHING HELP MEEE!!!
@SchipholAviation click “Add Connection” and manually connect the logo to any fuselage piece
@RepublicOfCursedPlanes hey, i am making an airasia x logo for the vertical stabilizer but when i load the aircraft it falls? if i try to connect it, it says "0 found connections". Im a beginner and i dont know much, what should i do?
@RepublicOfCursedPlanes step by step?
@AverageFedExMD11 same as how it’s done normally, but vertical.
If you want a horizontal cheatline on the stabiliser, just adjust the dimensions of the cross-section so that it’s flush with the stabiliser.
@RepublicOfCursedPlanes yo, how do i make cheatlines in the vertical stabilizer